Hey guys !!!
Alrighty I have had some girls ask me how I made my nail polish rack , so I figured since Im making a new polish rack for my sister in law that id post it for all to see . =)
I had originally made my 1st nail polish rack the same way everyone else had done it , using a glue gun , some foam boards and fancy smancy duct tape . Now with that being the fast and cheap route it didn't hold up for too long . A couple of the shelving had fallen off Id fix them and they'd fall again .... lucky for me none of the polish bottles had any crazy breakage and I didn't get polish all over my floor . Unfortunately for some they were not so lucky in that and got polish on their carpet . So kicking myself for not going the wood route the 1st time like I had wanted to I did foam board and kinda wasting my time and some money .
But now I am haaaapy as can be with my polish rack and have not had any issues with it .
This is my rack hanging right now <3
Below I have photos of the rack I just made for my sister in law . I tried to take photos as I went so that you too can make this polish rack .
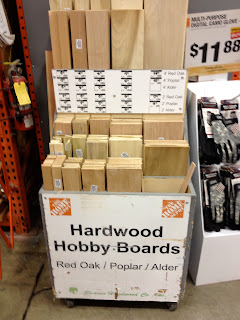
I went to a local hardware store near my house which was Home Depo and headed towards the lumbar and came across these hobby boards when I was making my polish rack .
I just had the guy there cut them down to the lengths that I wanted . ( double check all the pieces next to each other and make sure they are all the same before you leave )
There were 3 types of hobby wood I went with Poplar because it was the cheapest @ $1.84 a piece .
What I did here was take some scotch tape and used that to hold the pieces together while I was figuring out the spacing for each shelf . Then I took a pen and marked the side panels for where each self was .
The glue that I used was Gorilla wood glue ( you can also find this at the hardware store)
Make sure any glue that you pick up esspecially the gorilla glue that it says no foam . trust me you don't want that. hahah
What I did here was glue the outside panels together and used the same pieces of tape that I saved from the test run to hold the panels together .
I let that sit over night because I started this after I got off work so it was late , But letting the outside sit with out the inside panels was i think better for later . For when I go to do the shelves I don't have worry about being super careful.
Again scotch tape to help =)
Using my fingers to smooth out the glue
Double checking the spacing with the tallest polish bottle I have.
After letting it sit and dry for a couple hours I went out and ran some errands ;-)
Once the whole thing is good and dry I got some small nails to tack the shelves for another added security to the shelving .
For a little added touch to my sister in laws polish rack I added her name to the top.
TADA!!!!! painted and completed !
I hope that this was helpfull to you guys annnd if you happen to try this out let me know =)
have a greaaaaat day !!!


Wow! That's awesome! My foam rack fell & created a mess too. I want to try this...what sizes did you get for each board?
ReplyDelete0.25x2.5x2ft :)
ReplyDeleteYay! Thank yooou! <3
DeleteCongrats! I've nominated you for a Leibster Award! Heres all the information on it: http://dulllikeglitter.blogspot.com/2012/09/liebster-award.html
ReplyDeleteAwesome polish rack! <3
What dimensions did you use for the rack for your SIL? I am looking to make a rack smaller than the 24X36 ones everyone is making. Also, did you use any backing on it? Yours seems like the easiest to make out of all the ones I saw so far. Thanks!
ReplyDeleteIm so sorry I haven't answered your questions till now i could have sworn i had when you commented.
DeleteBut the dimension of my sisters in laws polish rack im not 100% sure . i had made it off of the fly , my polish rack i made to fit the wall i had it on so i just measured that to fit the space.
i did not use a backing on my sister in laws rack , however for mine i did .
Thank you so much for stopping by my blog !
It's quite impressive....great job...
ReplyDeleteI have been looking everywhere for a rack this simple! Every one I have seen goes way past what I need. But this is it, the simplicity and awesomeness is exactly what I've been looking for.
ReplyDeleteI was just wondering what you used to hang it. Did you add a spot on the back where you could fit a nail and hang it off of, or did you just nail it to the wall?
Do you how much nail polish it hold?
ReplyDeleteI love this one! Thank you so much, gonna do it!
ReplyDeleteI lovre it ive just openend my nails studio. I need shelving terterribly.there is noroom for the stands in my room.I need wall placements.
ReplyDeleteI lovre it ive just openend my nails studio. I need shelving terterribly.there is noroom for the stands in my room.I need wall placements.
ReplyDeleteI lovre it ive just openend my nails studio. I need shelving terterribly.there is noroom for the stands in my room.I need wall placements.
ReplyDelete